• About
  • Draw For Yourself
    • Tutorials
    • Tips and Techniques
      • Learn How To Draw People
    • Courses
  • Storytelling
    • Characters
    • Worldbuilding
    • Art Imitates Life
  • Art Inspiration
    • Favorite Artists
    • Favorite Movies
    • Favorite Shows
  • Faith
    • Encouragement
    • Illustrated Bible Stories
    • Bible Verses
  • Art Crafting
    • For The Home
    • Products
  • Contact

Drawing The Face From The Side View

January 2, 2023

As an artist, it’s essential not only to know how to draw the human face but also to be able to draw a face from the side. Unfortunately, most prefer drawing facial features from the straight-on view instead of experimenting with different angles. However, this is not the best decision.

To grow artistically, you must actively seek out the subjects and angles you know are a challenge. For example, the complexity of the human face is clear to see once the head starts turning, and each feature morphs into the most unexpected shapes. But if the doubt of tackling this task seems too intimidating, don’t worry! Let’s start by recognizing the differences between how each feature looks from the front and side view.

This shows the end result of drawing a face from the side view.

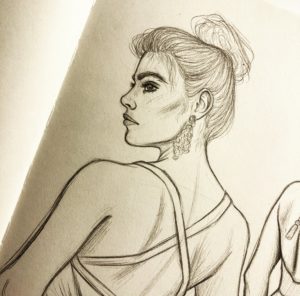
How To Draw A Face From The Side View


First, observe the differences in your face by studying your features through pictures or in the mirror. Each part of the face takes on a new shape depending on what angle you’re looking at—meaning that the way to draw them will change regularly.

Whether using pencil and paper or drawing digitally, knowing how to pace yourself while drawing a subject is essential. There is no need to try and start drawing the entire face at once. While following along, you will see that drawing a face from the side view can be done with a few simple steps.

1. Head Shape


It all starts with drawing a simple oval for the head—indicating that the face looks to the side instead of straight on. Keep your grip on the pencil and lines on the paper very loose because you will outline these initial sketches with darker outlines at the end. Doing this strategy allows you to make changes as you go. The face shape will connect to the oval, so make a curved line that eventually bends to represent the jawline.

An oval represents the head shape of the face.

The face shape extends to show the face from the side.

2. The Mask

After you’ve drawn the outlines of the head shape and the face in the side view, it’s helpful to make a blueprint of where the facial features will go. I call this technique “the mask” because it creates a nice boundary around the area you must focus on for the next couple of steps. Looking closely, you can see that the outline molds into the shape of the features themselves, like the arch of the eyebrows, and it also goes inward to show the narrowing of the nose. Using this technique on top of the general area of the face can be beneficial.

Get your free guide to learn how to create better drawings!

Get Your Free Guide!

It is also vital to draw two lines across the face to better understand where the features will go from the side view. The first line represents the top of the ear and its relation to where the eye will go. Meanwhile, the second line will point to the earlobe and indicate where the bottom of the nose will be.

The mask will help as a guideline for the rest of the face.

Each facial feature has a designated area on the face.

3. Eyes

Regarding the eyes, simple circles will always be your best bet. First, sketch the circle lightly to serve as a guideline, and then draw the eyelids in a triangular shape on top of it. These lines help show the eyeball from the side and the pupil.

Check out how to draw realistic eyes for a more detailed tutorial.

The guideline for the top of the ear shows where the eye will be.

The side view of the eye helps by drawing a circle as the outline.

4. Ears

The ear serves as the anchor while drawing the entire face because it provides a guideline for all the other locations of the facial features. Depending on the face you are creating, the ears can be different sizes, but they all serve the same purpose. As previously stated, the top of the ear signals the area where the eyes will go on the front of the face, while the bottom shows where the bottom of the nose will be.

The ear also shows where the bottom of the nose will be drawn.

5. Nose

Speaking of the nose, it is another facial feature that helps anchor the rest of the face. Start by drawing simple circles that represent the tip and sides of the nose. Allow those lightly drawn circles to guide you into outlining the nose and the nostrils. Then connect those to the arch or slope you want.

These steps will help when you want to draw the nose from other angles.

Use simple shapes to create the tip of the nose.

The bottom of the ear and nose are aligned on the face.

6. Lips

Finally, indicate the corner of the mouth with some indentation for a reference on where the lips start. Use simple circles again to signify the top and bottom lips and connect them through the lip line. Then outline the shape you want for the actual lips. Depending on the face you want to create, the lips can be full, thin, plump, or straight across.

Check out more resources on how to draw the lips in more detail and angles.

Draw the lips with simple shapes for the outline.


Tips For Drawing Side Profiles For Beginners


Combining all of these steps will ensure you better understand how to draw a face from the side view. Remember to approach this subject without rushing yourself, softly sketch everything until you complete the entire face, and use a darker outline over it. Be sure to share what was helpful for you!


Learn some tips and techniques to create better drawings!

Get Your Free Guide!

Download this guide and fill up your sketchbook with new inspiration.

How To Draw Noses Step By Step

January 2, 2023

If you’re an aspiring or beginner artist, learning to draw facial features is crucial for creating captivating characters and lifelike portraits. Unfortunately, one feature that often presents a challenge for many artists is the nose.

But why is it so important to learn how to draw noses accurately? Firstly, a nose is the anchor of the face, located right in the center. They can also convey much information about where the head is turned and how the face is positioned. The nose is one of the most distinctive features of the face, and even the slightest variations in the bridge, nostrils, or tip can make each nose look unique.

Below is a step-by-step guide on how to draw noses accurately and confidently. Whether you’re a beginner or just looking to refine your skills, this guide will give you the knowledge and techniques to draw realistic noses.

learn how to draw a nose from an angle with these simple shapes.

Drawing A Nose For Beginners


Drawing the nose can seem intimidating for beginner artists, but that doesn’t mean you shouldn’t practice drawing them. By learning the basics and practicing, you can gain the confidence needed to create more detailed and accurate nose drawings. In addition, taking the time to learn how to draw noses will enhance your artistic abilities and provide a strong foundation for drawing other facial features.

The first step in drawing a nose is to understand its basic structure. The nose contains three main parts: the bridge, the nostrils, and the tip. The bridge is the uppermost part of the nose and is made up of bone and cartilage. The nostrils are the openings in the nose that allow us to breathe, and the tip is the bottommost part of the nose.

Drawing Different Noses

It is also important to remember that there are infinite types of noses in the world! Yours might look completely different from a family member’s and undoubtedly different from a stranger’s. These slight changes are why studying the anatomy of the nose is essential. The foundational knowledge will help you make minor adjustments depending on the type of nose you want to create.

1. Draw Three Circles

Once you understand the basic structure of the nose, it’s time to start sketching. Begin by drawing a simple circle to represent the tip of the nose. You can also draw an oval to represent the bridge of the nose. Next, add two smaller circles on either side of the bigger circle to create the sides of the nose. Check out my Instagram video below to see how I draw noses:

How To Draw a Realistic Nose from the Side

Drawing noses from the side is just as important as drawing them from the front. It provides a better understanding of the structure of the nose and how it connects to the rest of the face. In addition, the nose takes on a different shape and perspective when viewed from the side, with the bridge and tip being more prominent. By practicing drawing noses from different angles, you’ll be able to create more dynamic and exciting portraits and characters. Plus, understanding the structure of the nose from different angles will also help you in shading and adding details to the nose, making it look more realistic and three-dimensional.

to draw a nose from an angle focus on simple shapesuse the softer shapes to outline the noseshade around the nose for a more realistic look


View this post on Instagram


A post shared by Portrait Sketch Artist | Art Tutorials 🌙💕 (@dream2draw)


2. Add The Septum of The Nose

To add more details to the nose, focus on drawing the septum, the cartilage that divides the nostrils. Sketch it with two curved lines that start from the tip of the nose and meet at the bottom of the nasal bridge. Remember that septums can be very different depending on the person and the size of the tip of the nose. Above all, make sure it is proportional to the rest of the nose, and make any necessary adjustments before moving on to the next step. 

to draw a realistic nose remember to start with simple ovalsuse the shapes to outline the nose and nostrils

3. Outline the Nostrils 

When drawing nostrils, paying attention to their shape and placement is essential. The shape of the nostrils can vary depending on the angle and position of the nose, but generally, they are wider at the base and taper towards the tip. To draw the nostrils, start by adding the outer edges or flares. 

Get your free guide to learn how to create better drawings!

Get Your Free Guide!

Then, draw a curved line connecting the flares to add the bottom part of the nostrils. Finally, add some shading to create depth and give the nostrils a more three-dimensional look. Remember to blend the shading to create a smooth transition between the nostrils and the rest of the nose. Remember, practice is critical to mastering the art of drawing nostrils, so keep practicing until you’re happy with the result!

  define the outline of the nose in the front angle

4. Add Some Shading

Shading is an essential part of drawing a realistic nose. By adding shadows and highlights, you can create the illusion of depth and dimension, giving the nose a three-dimensional appearance. The key to shading a nose is to understand the form and structure of the nose, as well as the direction of the light source. Establishing the light source will help determine where shadows and highlights are placed. 

By adding shadows on the underside of the nose, you can create the illusion of a rounded, curved shape. Adding highlights to the tip and bridge of the nose can make it appear more prominent. A nose can look flat and lifeless without shading, so taking the time to add shading can bring your artwork to life.

shade the nose for a more realistic look

5. Practice and Find Inspiration

As with any skill, the key to becoming proficient at drawing noses is practice, practice, practice. Keep going even if your first attempts turn out differently than you imagined. Keep practicing, and you’ll gradually improve. One helpful tip is to study different noses from different angles, which will help you better understand how to draw them accurately.

Another critical aspect of improving your nose drawing skills is finding inspiration from other artists. Look at how they draw noses, and try incorporating what you like into your work. Remember that everyone has their unique style, and no “right” way to draw a nose exists. Keep experimenting and practicing, and you’ll find your style over time.

Learn some tips and techniques to create better drawings!

Get Your Free Guide!

Download this guide and fill up your sketchbook with new inspiration.

Drawing Lips Step-by-Step

January 2, 2023

Lips are like the unsung heroes of the face. They can convey a wide range of emotions without uttering a single word. From a mischievous smirk to a pouty pucker, they’re a crucial ingredient in capturing the essence of a character. So, if you want to inject life and personality into your drawings, mastering the art of drawing lips is a must.

how to draw easy lips by following these steps.

Are lips hard to draw?


Lips have intricate shapes, subtle curves, and unique textures that require careful observation and practice to capture accurately. Mastering the art of drawing lips is a journey that improves with time, dedication, and perseverance.

The key is to approach it with patience and a willingness to learn. Break down the process into smaller steps, study the anatomy of lips, and practice regularly. As you develop your observation skills and understanding of light and shadow, you’ll gradually gain more control over creating realistic and expressive lips.

How do you draw lips for beginners?


Drawing lips is essential for any beginner artist who wants to bring their characters to life and infuse their artwork with emotion. Lips are more than just a simple facial feature; they are a powerful tool for expressing personality, conveying mood, and capturing the essence of a subject. 

Whether you aspire to create realistic portraits or delve into fantasy, learning to draw lips will open up a world of artistic possibilities.

Step 1: Start with Basic Shapes

To begin, draw a light outline of the lips with basic shapes. Start with lightly drawn ovals next to each other. The size of these ovals will depend on how full you want the top lip to be. Next, draw a bigger oval below them that will represent the bottom lip. To indicate the size of the mouth, blueprint the corners of the mouth.

to draw lips easily focus on drawing simple shapes.

Step 2: Define the Shape of the Lips


Now that you have the basic shapes in place, it’s time to refine the shape of the lips by sketching out the general shape of the upper and lower lips with simple curves. Pay close attention to the curves and angles of the lips, and make sure they are in proportion with each other. Don’t forget to add a slight dip in the center of the upper lip, known as the cupid’s bow. 


Get your free guide to learn how to create better drawings!

Get Your Free Guide!


Step 3: Add the Details


With the shape of the lips in place, it’s time to add the details. Start with the corners of the lips, which should be slightly rounded and taper down towards the center. Then, add the lines that define the outer edges of the lips. These lines should be subtle and not too harsh.

Next, add the lines that separate the upper and lower lips. These lines should be gentle and not too prominent.

Step 4: Final Touches


To make your lips look more realistic, it’s important to pay attention to the texture. Lips are not smooth, so use your pencil or pen to add some subtle lines and creases that represent the natural texture of the lips.

all elements to draw easy lips.

With these steps in mind, you can now confidently draw lips that are both realistic and expressive. Remember, practice makes perfect, so keep practicing and experimenting with different techniques until you find what works best for you.


Learn some tips and techniques to create better drawings!

Get Your Free Guide!

Download this guide and fill up your sketchbook with new inspiration.

How To Draw Realistic Eyes In 5 Easy Steps | Dream2Draw Art

January 2, 2023

The eyes are the window to the soul. So, for them to convey what you want, it’s crucial to learn how to draw them for any future characters or portraits you want to create. Before exploring the types of stylizing, learning how to draw realistic eyes, in particular, will help you understand their foundational anatomy— rules bound to be broken to your liking as you find your artistic style. 

Several sketches of different eye shapes and angles.

Drawing An Eye For Beginners


If you’re a beginner at art, you should ensure you have some basic supplies for your art journey. A simple piece of paper or a new sketchbook is excellent, along with whatever pencil you’re comfortable with (I like mechanical pencils for light but buildable lines, but go with whatever type of pencil feels suitable for you). 

Besides supplies, it’s essential to have the right mindset. Do not be discouraged or compare your drawings to your favorite artists’ work. Instead, focus on wanting to learn something new without expecting it to be anything other than a good and relaxing outlet for you. And please always keep your old sketches (even if you don’t think they look good). These will serve as motivation and inspiration once you look back and see your improvement over time! 

Now, let’s move on to five easy steps that’ll help you draw realistic eyes step by step!

1. Draw A Circle


The number one tip for beginners to draw a realistic eye is to break down the subject into simple shapes. Doing this will make sure you avoid the tendency to focus on the details too early on. In addition, this approach ensures you’re not overwhelmed and that your drawing is not too large and runs off the page. 

Begin with a lightly drawn circle regardless of the eye’s angle. Remember, it doesn’t matter how different the eye looks in certain angles; at its core, it’s always an eyeball! 

2. Outline The Eye Shape 


Once you draw the circle as a base, it is essential to consider what eye shape you are going for. How you sketch out the next couple of lines will determine the entire look. Start with the tear duct, then let the top line slide gradually across the circle. The bottom line will be curvier and determine how round or almond-shaped the eyes will be.

Drawing The Eye Shape

3. Draw The Eyelids


The top line will naturally divide the eyeball into three parts, meaning it will slowly curve across it from a slightly upwards line to a straight-across and then back down to the corner of the eye. Once you’ve drawn that, you indicate how the top eyelid will go, including how the skin on the brow bone sits on the eyelid, creating different looks, such as hooded eyes. Drawing The Eyelids

Get your free guide to learn how to create better drawings!

Get Your Free Guide!

The Direction of The Eyelids

4. Draw The Eyebrow Arch


When it comes to the skin around the eye, it not only determines how the eyelid sits but also how the eyebrow wraps around it. For the most part, you can determine the space the eyebrow will take up by identifying specific markers. For example, the tear duct indicates the beginning of the brow; the pupil cues the brow’s arch, and the eye’s outer corner signals its tail.

Eyebrow Arch Diagram

Keep in mind that the arch of the brow will depend on the kind of look you’re going for. For example, some eyebrows emphasize hooded eyes by having a minimal arc. In contrast, the more arched eyebrows lift the eyes a bit. Small changes like that will drastically change the kind of eyes you are drawing.

Eyes In Side View Drawings

5. Add Depth With Some Shading


Lastly, add some depth by shading to bring it to life! Doing so means adding darker spots in the areas where they naturally appear. For example, the pupil should be dark and darken the creases formed by the eyelids to indicate skin folding. 

It is also essential to consider where the light source would be: so, if the light comes from an angle, make sure that places where the light hits are brighter by making the shading darker in areas where the light would not hit. 

How To Draw Two Perfect Eyes


Great! Now that you know the steps in drawing a realistic eye, you might ask yourself: Okay, but how do I guarantee the other one is just as accurate? 

The best way to do this is by adding an additional circle in between them to act as an imaginary eye inside. I have illustrated this technique in one of my Instagram posts. This technique will help evenly space out both eyes and give you a reference as you mirror all the steps you did for the first eye to the other one. 

Drawing Two Realistic Eyes ProcessDrawing Two Realistic Eyes

All in all, remember how beneficial it can be to look up references for different eyes to get a sense of their shape and other characteristics. Doing so will show that eyes can range from round to almond-shaped. The slightest alterations can create a different kind of eye. If you need help finding references, check out my Pinterest pins for inspiration!

It is also excellent to practice drawing eyes from several angles. It will significantly benefit you when drawing faces in general. For future reference, come back to remember how to draw realistic eyes step by step, or check out my class for more information.

Want to learn more about how to create better drawings?

Get Your Free Guide!

Download this free guide and fill up your sketchbook with more confident drawings!

Drawing People

January 2, 2023

The most complex and rewarding subject to draw is a human being. This is why it is important for every single artist to not only study but feel comfortable drawing faces.

Think for a moment if this has ever happened to you: You’ve been spending time learning how to draw and it’s not long before you are completely enamored by all the cool visual stories or specific artworks you dream of making. The only problem is, what you’re drawing is not matching up with what you imagined. I mean, what does a hand in that specific position, holding that object actually look like? This is the moment when most realize that visual references and muscle memory are absolutely essential. Without either of them, it is impossible to transfer art from their mind to paper. learning how to draw people means learning about all facial features.

This is what Dream2Draw Art is all about. It is a place where fellow artists gather to explore the ways in which they can learn how to create the art they dream of. This all stems from a growing passion to provide tips and techniques so that other artists can draw for themselves.

learn to draw people with more in depth tutorials.

That mission has morphed into sharing my sketching videos on various social platforms and creating online courses. A designated space has been created to store all kinds of art advice that will be beneficial for all artists to accomplish this. This is where you will find resources to help you learn how to draw people. It includes specific tips on how to draw each feature of the human face and body.

Drawing People is my favorite.


Copyright © 2025 · Theme by Marketing Templates Co.

Affiliate Disclosure - Terms and Conditions - Privacy Policy